Subscribe to Live sound International here
READ ME
In the following pages you’ll find frequency traces of various IEMs measured with MiEMi™ adapters. The equipment used for each measurement is listed along with the trace image in the following format;
- MiEMi™ model
- Microphone
- Soundcard
- Software and version
If you have traces of IEM models you’d like to see added to the list email us with the following;
- A high res image of the trace (2070x 1520 pixels)
- A list of the equipment used to make the measurement
Only posts made with MiEMi™ will be uploaded to the list
Posts containing measurement data are intended only as a guide for comparison purposes. SLS Audio takes no responsibility for the accuracy of these traces.

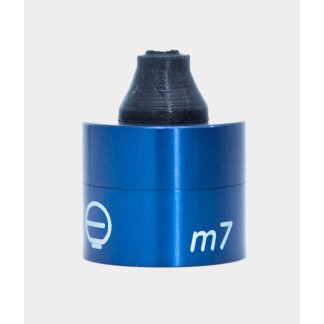
MiEMi-m
Not testing your bands in ears yet? You should be, click here to see why regular testing & cleaning can help you. Test your in ear monitors and have absolute confidence they work befo…
How To Test In Ear Monitors With MiEMi-m™
For this guide I’m assuming you have a functional measurement system & sound card set up. Make sure you’ve cleaned any goo or wax out of your IEM’s as this will affect your measurements.
For those that prefer to watch a video demonstration
First thing to do is sit MiEMi™on top of your measurement mic and make sure it’s inserted all the way. Then push the end of the rubber coupler back in on itself. Push the IEM into the rubber coupler as far as it will go (see photos). It’s important to push the IEM’s in as far as you can into the coupler. MiEMi has a 12mm long canal giving a half wave cancellation at around 13Khz just like an IEC711 ear simulator, so increasing the distance between the IEM & MiEMi™ changes the effective length of the canal.


You’re now ready to measure with MiEMi™, start your analyser software and you should now get a trace. I tend to use averaging of about 1 second to minimise handling and background noise interference and smoothing of around 1/3rd or 1/6th of an octave. I typically find I have to zoom out on the vertical axis (- button on SMAART) to get a decent view of the whole trace. If all goes well you should end up with something like the the image below. We recommend the following analyser settings for best results, set averaging to around 1 second and smoothing to 1/3 or 1 octave.

I tend to store a L&R trace for each band member’s IEM’s at the start of a tour and check them after cleaning each day. I generally clean them with antiseptic wipes & an in ear vacuum cleaner. By Measuring them I’m 100% sure they working when I give them to the band and can quickly identify any inconsistencies.
Isn’t it about time you started checking your in ears? Visit the store and buy yours now

Still unsure if MiEMi-m™ can help you? Contact us via this form
Happy Measuring!
Sony MDR-EX800ST
| Device: | MiEMi-m8 |
| Measurement Mic: | Earthworks M23 |
| Soundcard: | Audient EVO 8 |
| Measurement Platform: | Smaartv8 |
| Other info: | Measured by Wen Xuan |
| Manufacturer’s page: Sony MDR-EX800ST |
-
 MiEMi-m™ & iSEMcon EMX7150 System Kit
 -
 MiEMi-m€249.00 ex VAT
 -
 Jodi-Consumer IEM Vacuum Cleaner€149.00 ex VAT
Sennheiser IE4
| Device: | MiEMi-m7 |
| Measurement Mic: | iSEMCON EMX7150 |
| Soundcard: | Audient EVO 8 |
| Measurement Platform: | Smaart Suite V9 |
| Other info: | by Krzysztof Polesinski |
| Manufacturer’s page: Sennheiser IE4 |
-
 MiEMi-m™ & iSEMcon EMX7150 System Kit
 -
 MiEMi-m€249.00 ex VAT
 -
 Jodi-Consumer IEM Vacuum Cleaner€149.00 ex VAT
Sennheiser IE8
| Device: | MiEMi-m7 |
| Measurement Mic: | iSEMCON EMX7150 |
| Soundcard: | Audient EVO 8 |
| Measurement Platform: | Smaart Suite V9 |
| Other info: | by Krzysztof Polesinski |
| Manufacturer’s page: Sennheiser IE8 |
-
 MiEMi-m™ & iSEMcon EMX7150 System Kit
 -
 MiEMi-m€249.00 ex VAT
 -
 Jodi-Consumer IEM Vacuum Cleaner€149.00 ex VAT
Bose QC20
| Device: | MiEMi-m7 |
| Measurement Mic: | iSEMCON EMX7150 |
| Soundcard: | Audient EVO 8 |
| Measurement Platform: | Smaart Suite V9 |
| Other info: | by Krzysztof Polesinski |
| Manufacturer’s page: Bose QC20 |
-
 MiEMi-m™ & iSEMcon EMX7150 System Kit
 -
 MiEMi-m€249.00 ex VAT
 -
 Jodi-Consumer IEM Vacuum Cleaner€149.00 ex VAT
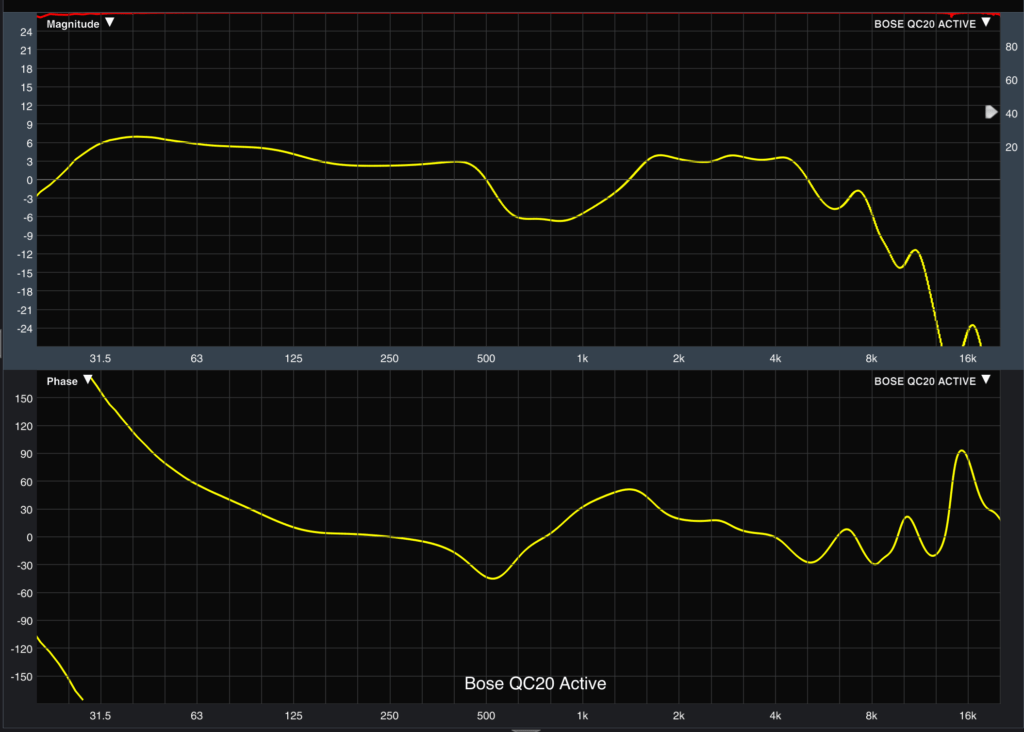
Bose QC20 Active
| Device: | MiEMi-m7 |
| Measurement Mic: | iSEMCON EMX7150 |
| Soundcard: | Audient EVO 8 |
| Measurement Platform: | Smaart Suite V9 |
| Other info: | by Krzysztof Polesinski |
| Manufacturer’s page: Bose QC20 |
-
 MiEMi-m™ & iSEMcon EMX7150 System Kit
 -
 MiEMi-m€249.00 ex VAT
 -
 Jodi-Consumer IEM Vacuum Cleaner€149.00 ex VAT
Sennheiser IE100
| Device: | MiEMi-m7 |
| Measurement Mic: | iSEMCON EMX7150 |
| Soundcard: | Audient EVO 8 |
| Measurement Platform: | Smaart Suite V9 |
| Other info: | by Krzysztof Polesinski |
| Manufacturer’s page: Sennheiser IE100 |
-
 MiEMi-m™ & iSEMcon EMX7150 System Kit
 -
 MiEMi-m€249.00 ex VAT
 -
 Jodi-Consumer IEM Vacuum Cleaner€149.00 ex VAT
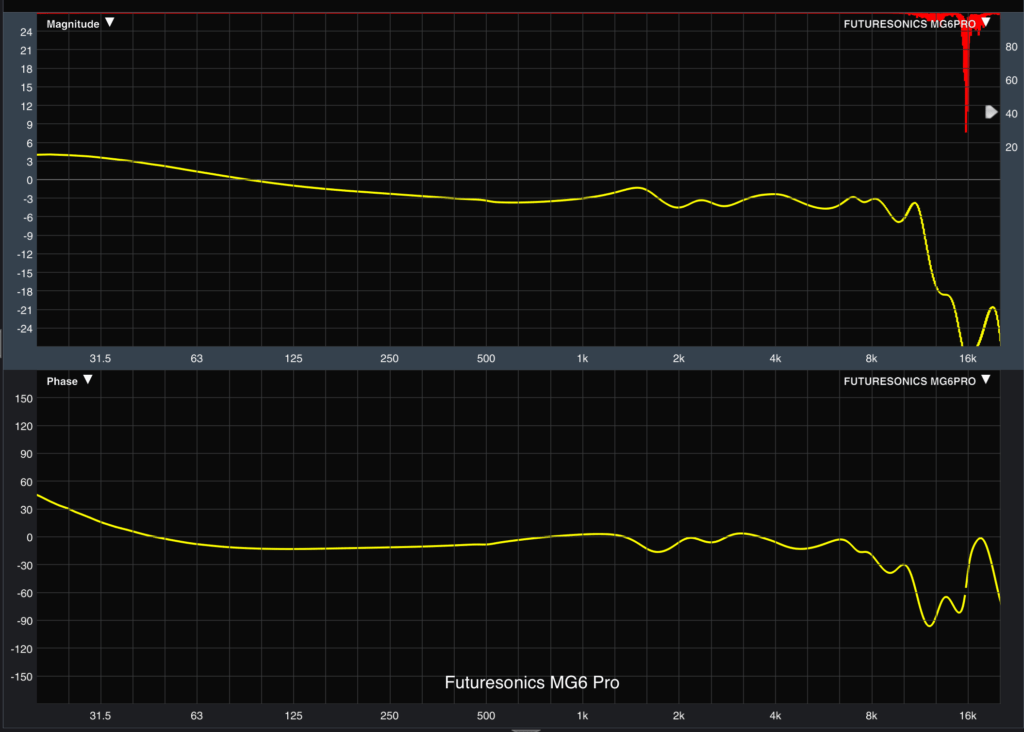
Futuresonics MG6 Pro
| Device: | MiEMi-m7 |
| Measurement Mic: | iSEMCON EMX7150 |
| Soundcard: | Audient EVO 8 |
| Measurement Platform: | Smaart Suite V9 |
| Other info: | by Krzysztof Polesinski |
| Manufacturer’s page: Futuresonics MG6 Pro |
-
 MiEMi-m™ & iSEMcon EMX7150 System Kit
 -
 MiEMi-m€249.00 ex VAT
 -
 Jodi-Consumer IEM Vacuum Cleaner€149.00 ex VAT
Westone UM ProX30
| Device: | MiEMi-M |
| Measurement Mic: | iSEMCON EMX7150 |
| Soundcard: | Motu Ultralite Mk3 |
| Measurement Platform: | Smaart |
| Other info: | |
| Manufacturer’s page: Westone ProX30 |
-
 MiEMi-m™ & iSEMcon EMX7150 System Kit
 -
 MiEMi-m€249.00 ex VAT
 -
 Jodi-Consumer IEM Vacuum Cleaner€149.00 ex VAT
64 Audio A18s
| Device: | MiEMi-M |
| Measurement Mic: | iSEMCON EMX7150 |
| Soundcard: | Motu Ultralite Mk3 |
| Measurement Platform: | Smaart |
| Other info: | |
| Manufacturer’s page: 64 Audio A18s |
-
 MiEMi-m™ & iSEMcon EMX7150 System Kit
 -
 MiEMi-m€249.00 ex VAT
 -
 Jodi-Consumer IEM Vacuum Cleaner€149.00 ex VAT
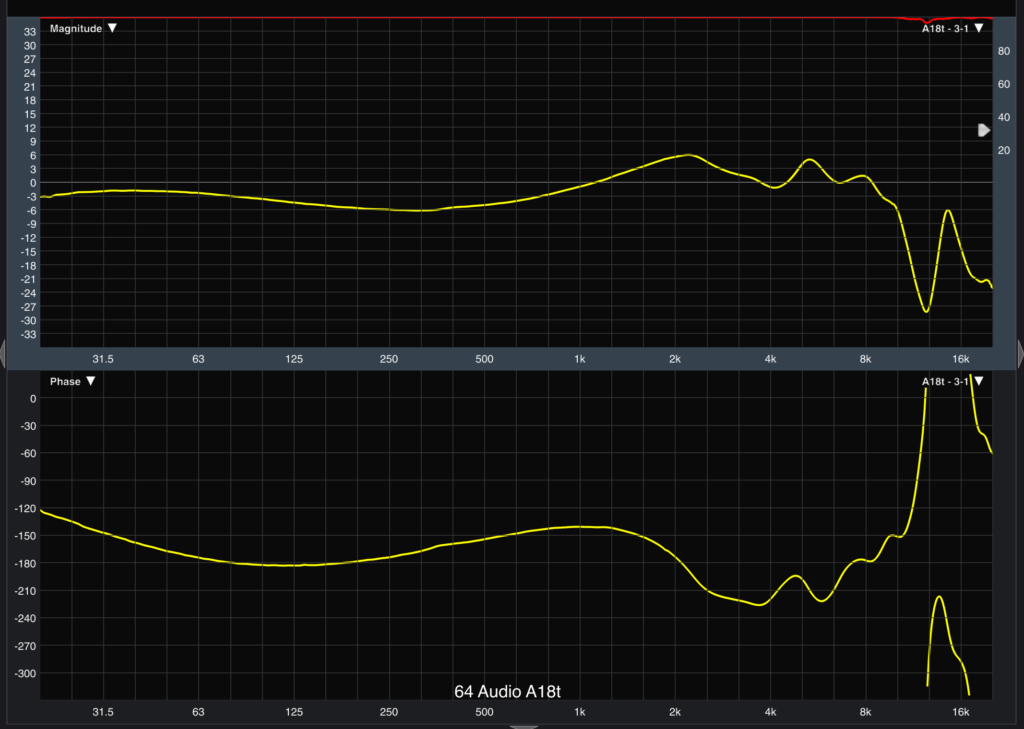
64 Audio A18t
| Device: | MiEMi-M |
| Measurement Mic: | iSEMCON EMX7150 |
| Soundcard: | Motu Ultralite Mk3 |
| Measurement Platform: | Smaart |
| Other info: | |
| Manufacturer’s page: 64 Audio A18t |
-
 MiEMi-m™ & iSEMcon EMX7150 System Kit
 -
 MiEMi-m€249.00 ex VAT
 -
 Jodi-Consumer IEM Vacuum Cleaner€149.00 ex VAT


