


Subscribe to Live sound International here

Rich Sydney knows a thing or to about IEM care and maintenance being the on-site service man at ClearTune Monitors and having previously been maintenance manager at JH Audio here’s his guide to cleaning IEMs
For those that prefer video you can see Rich’s guide on JH Audio’s you tube channel
In a time when you are going to great measures to keep everything clean, there is no reason to be putting a dirty in-ear monitor into you or your artist’s ears! Here are some simple steps and basic maintenance tips for you to help keep your IEMs clean and working properly for years to come.
After use, the IEMs and cable should be cleaned and dried before being put back into the case. Wax buildup and moisture are the two biggest things that can cause issues with the monitors. Keeping the ear pieces clean and dry will keep the IEMs in their best working condition.
To begin cleaning the IEMs, wipe down the outside of the pieces with a soft towel or microfiber rag and a bit of rubbing alcohol. I personally like to use the individually wrapped alcohol pads. These are available at any Walmart, CVS/ Walgreens or other local store that sells health related goods. The alcohol will break up and clean any wax or dirt that has built up on the shell and also help evaporate any excess moisture on the IEM. Periodically, also remove the cable and clean the socket. The socket area is a prime spot for corrosion to occur due to excessive sweat. If this area is left unattended, over time the corrosion will build up and ruin the socket and possibly the cable. Damage due to corrosion is not under warranty.
You can clean the cable the same as the outer shells of the ear pieces. A soft towel and rubbing alcohol will help remove sweat and keep the cable lasting. The clear cables can eventually turn green. It is a natural process that occurs when the wires are repeatedly exposed to sweat. This “greening” of the wire will not affect the sound or quality of the cable.

To better maintain the inside of the IEMs, you can use the loop styled end of the supplied cleaning tool. This will help you reach any wax or dirt build up in the shallow part of the canal. We do not advise inserting any foreign, non-approved object down the canals. There are soft tubes inside the ear that carries the sound and several filters that are used to regulate driver output. If one of those tubes or filters are punctured, it will affect the sound quality.
For deeper cleaning, we recommend using a Jodi Vac. It is essentially a small vacuum cleaner with a dull “needle” type end on it. This can be safely and gently inserted into the IEMs to help remove deeper wax. Never insert any kind of liquid or other cleaning agents into the IEM.
Lastly, if the monitors are being used in a situation where moisture or sweat are a big factor, never put the IEMs directly back into the case. Let them air out and dry for a bit. When you do put them back into the case, try to also include a small dehumidifier or silica packet. This will help draw moisture away from the drivers and out of the canal.
The only thing I would add to Rich’s cleaning routine is testing and measuring your IEMs to identify any issues early. Make sure you have plenty of IEM cleaning products for your next tour.
What about phase/time alignment and in-ears?
Allmost all serious in-ears contain more than 1 driver.
If you have a 3 way earpiece (for example with three drivers), the frequency spectrum is divided into three parts and you get two crossover points (the frequency where one driver takes over from the other): one speaker will do all the low frequencies, one the mid range and one the high range.
But if the sound of the different drivers does not reach your ears at the same time (because the driver responsible for the highs can be faster than the driver for the mid for example), you can get serious cancellations around the crossover points.
it seems that most manufacturers do not take this into account, often all drivers are in a row and time differences are not corrected.
In this image you can see this:

Jerry Harvey has fixed this and use their patented Freq Phase technology. With this he slows down/delays the fastest driver by putting longer tubes in between, so the sound from all speakers reaches your ears at the same time.
Read / see more about this here:
https://jhaudio.com//freqphase
https://www.youtube.com/watch?v=L3tyY1nRq5E
Now on to the measurements to prove that this works…
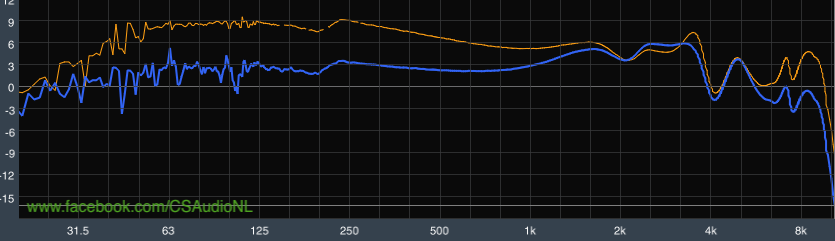
Here the measurement of the phase of three in-ears:

Pink: Jerry Harvey
Yellow and (dark)green: two other major worldwide in-ear manufacturers
As you can see, Jerry Harvey has nowhere a 360 degree phase flip or something like that. And the phase of the entire frequency spectrum stays nicely between the 360 degrees.
But what does this do with the sound?

Pink: Jerry Harvey
Yellow: competitor (the earpiece of the photo)
The phase change below 100hz is due to the low-cut in the headphone amp.
As you can see, the Jerry Harvey has much more highs above 8khz. In addition, you can see that the ear of the competitor has a serious dip around 8kHz.
According to Jerry Harvey (what he says in the video about FreqPhase), this is because the phase is not in order. That sounds logical to me.
I think this is why people say that Jerry Harvey in-ears sounds more enjoyable and serene. Because there are no time/phase problems!
I tried to capture the inside of a Jerry Harvey earpiece to see all the tubes, you can clearly see the drivers are offset from each other.

Chiel Streutjes – CS-Audio – www.cs-audio.nl – www.facebook.com/CSAudioNL
Chiel Streutjes used a 7mm MiEMi™ with an Isemcon EMX7150 mic to make these measurements.

The ultimate touring measurement kit for IEM testing & system tuning/alignment and now with an SC1 SPL calibrator too. We got together with iSEMcon to put together this versatile system measurement kit. Measure frequency/phase for FOH system duties or make calibrated SPL measurements u…
During touring I discovered that my in-ears do not always have the same sound (which would be very nice, so I have always the same reference). Sometimes the in-ears sounded very muddy and far away.
Because of this I started to do a number of measurements and tests.
My in-ears sound good and give the same frequency response on a Schiit audio hi-fi phone amp, AudioQuest DragonFly Black/Red and FisherAmp in-ear amp2. Because of this I used the FisherAmp as a reference for all measurements.
First I measured a FisherAmp in-ear Amp 2, PSM300, PSM900 and PSM1000 as a line-out (without the load of an earpiece):

Green: FisherAmp
Yellow: PSM300
Red: PSM900
Blue: PSM1000
As you can see, all four are almost flat. However, the PSM900 and PSM1000 have a serious low-cut and high-cut and around these areas there is also a bump (probably because of the used crossover filter)
The next measurement is with the load of the in-ear:

As you can see, the high response is different. The PSM300 and PSM900 give less highs, around 10 kHz a db or 3-4 less (a quarter of the volume!)
The following measurement is the same earpiece on two mixing desks:

Green: reference (previous measurement on the FisherAmp)
Pink: Midas Pro serie
Yellow: Midas M32
As you can see there is a serious difference in the highs. This is exactly the problem I experienced live. This makes the earpiece sound muddy and far away.
Because of this shocking discovery, I have decided to test all-in-ear type’s on a good and bad phone-amp at the dealer of a large worldwide in-ear brand, here the results:
3-way – 4 driver 18 ohms:
Orange: FisherAmp (reference)
3 way – 8 driver 16 ohms:

Orange: FisherAmp (reference)
3 way – 12 driver 15ohms:

Orange: FisherAmp (reference)
3 way – 8 driver 28ohms:

Orange: FisherAmp (reference)
As you can see, the earphones at the two phone-amp’s give a completely different frequency response.
The conclusion: a good earpiece does not always sound good, it is the combination of earpiece and phone-amp. Even the phone-amps in beltpacks give different results, but especially the phone-amps in mixing desks are shocking!
The surprising thing is that the 8 driver 28 ohm earpiece is not bothered by anything. Probably because of the higher impedance, It looks like some phone-amps are not made for a mega low impedance, this is probably the cause of the problems.
Another thing is, the impedance in the specification of an earpiece is the impedance at 1khz, but what happens at other frequencies?!?
Many good/widely used in-ears have a low impedance:
UltimateEars UE6Pro: 12,5 Ohms
UltimateEars UE Live: 10 Ohms
Westone ES50: 20 Ohms
Jerry Harvey JH10x3Pro: 18 Ohms
Jerry Harvey JH16v2Pro: 18 Ohms
So be aware of the phone-amp you use in combination with your in-ears!
Chiel Streutjes – CS-Audio – www.facebook.com/CSAudioNL – www.cs-audio.nl
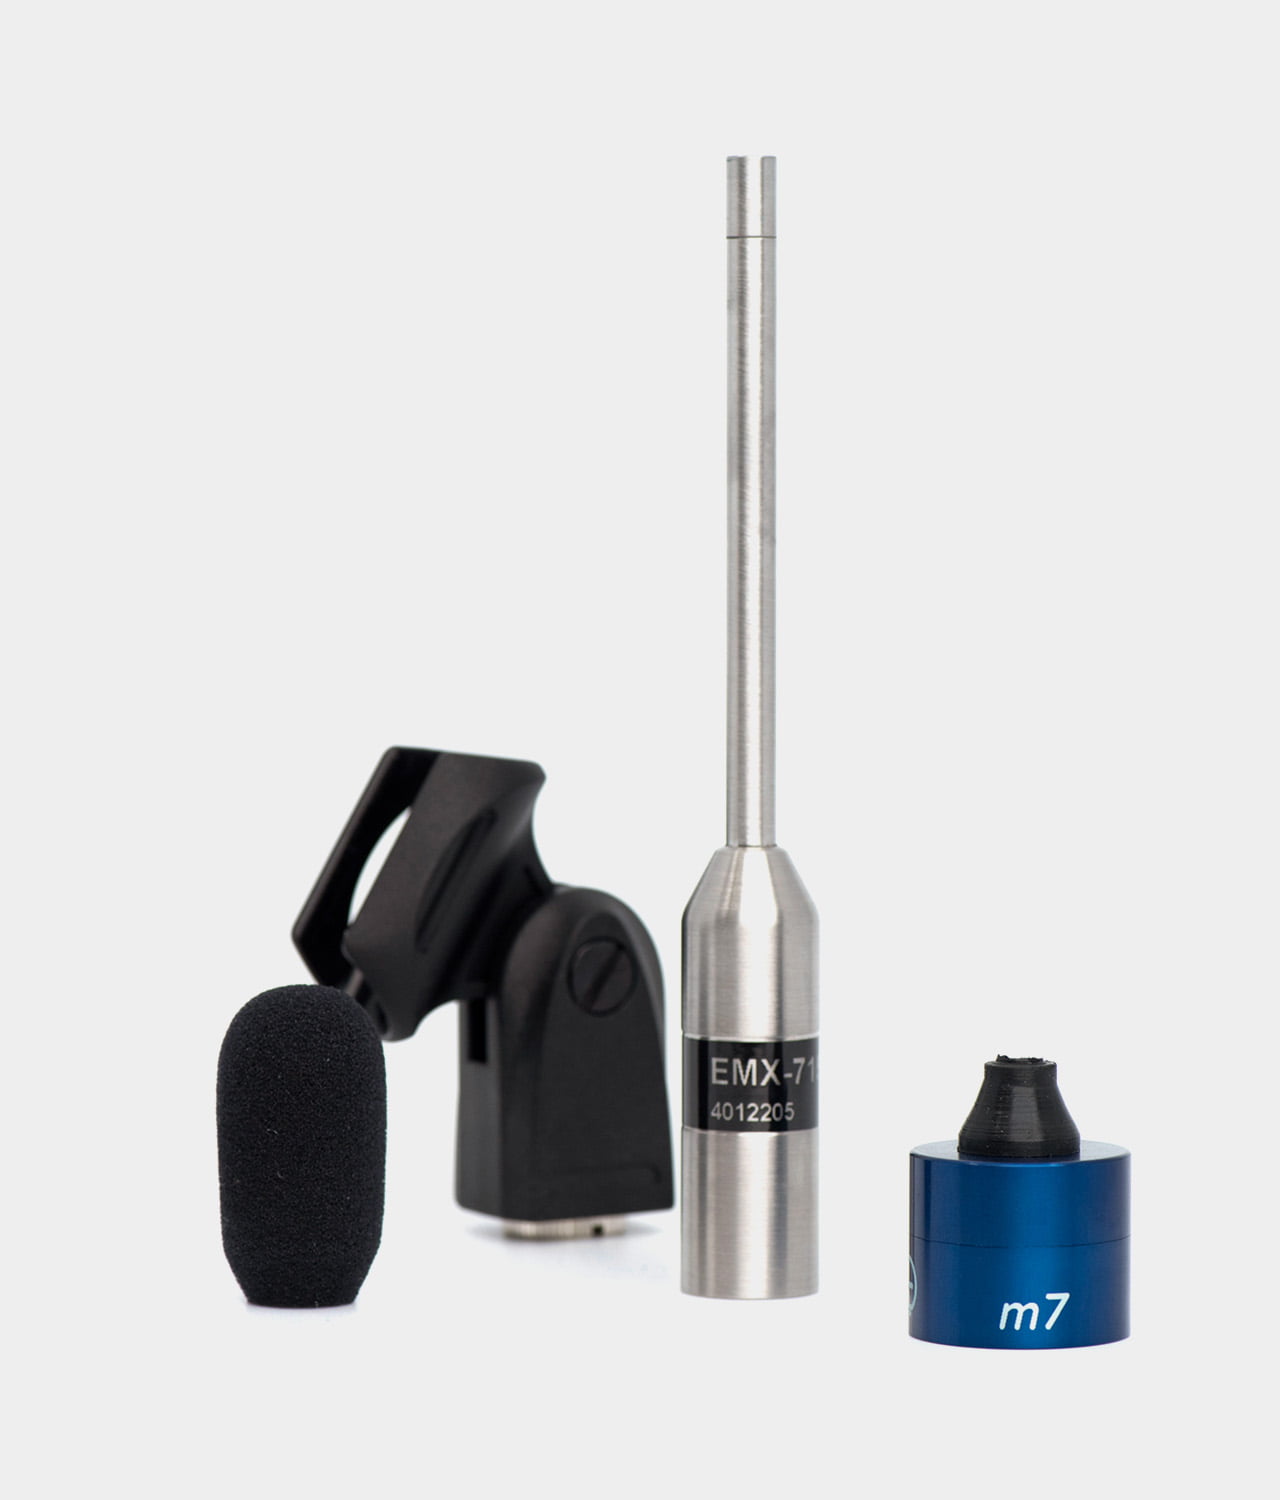
Don’t have a measurement mic? How about a 7mm MiEMi-m™ and an iSEMcon EMX7150 bundled together? Perform PA system measurements and test custom fit & generic in ear monitors with this entry level pairing.
Includes:
For this guide I’m assuming you have a functional measurement system & sound card set up. Make sure you’ve cleaned any goo or wax out of your IEM’s as this will affect your measurements.
For those that prefer to watch a video demonstration
First thing to do is sit MiEMi™on top of your measurement mic and make sure it’s inserted all the way. Then push the end of the rubber coupler back in on itself. Push the IEM into the rubber coupler as far as it will go (see photos). It’s important to push the IEM’s in as far as you can into the coupler. MiEMi has a 12mm long canal giving a half wave cancellation at around 13Khz just like an IEC711 ear simulator, so increasing the distance between the IEM & MiEMi™ changes the effective length of the canal.


You’re now ready to measure with MiEMi™, start your analyser software and you should now get a trace. I tend to use averaging of about 1 second to minimise handling and background noise interference and smoothing of around 1/3rd or 1/6th of an octave. I typically find I have to zoom out on the vertical axis (- button on SMAART) to get a decent view of the whole trace. If all goes well you should end up with something like the the image below. We recommend the following analyser settings for best results, set averaging to around 1 second and smoothing to 1/3 or 1 octave.

I tend to store a L&R trace for each band member’s IEM’s at the start of a tour and check them after cleaning each day. I generally clean them with antiseptic wipes & an in ear vacuum cleaner. By Measuring them I’m 100% sure they working when I give them to the band and can quickly identify any inconsistencies.
Isn’t it about time you started checking your in ears? Visit the store and buy yours now

Still unsure if MiEMi-m™ can help you? Contact us via this form
Happy Measuring!